
PAINTING GUIDES · LEAVENWORTH
Preparing wood siding for paint
Leavenworth Painting · Published October 28, 2026
Wood siding is ready for paint when the wood is sound, the water problems are corrected, the remaining coating is well bonded and the surface meets the selected primer and paint requirements. Washing and scraping are only part of that decision. Soft boards, recurring wet joints and a weak stack of old paint call for different work than a sound wall with a few bare spots.
This guide helps you compare preparation proposals for a Leavenworth exterior. For the complete project scope, see exterior painting; for a recurring failure, start with why exterior paint peels.
Identify the material before choosing the preparation
Solid wood clapboard, wood shingles, plywood, older hardboard and modern engineered wood can look similar under paint. They do not share every repair, washing or priming instruction. A wood-grain impression alone does not identify the material.
Look for installation records, leftover boards, manufacturer markings visible without removal and the construction of already exposed edges. Let the person assessing the siding resolve uncertain material identification before specifying aggressive cleaning or replacement. Do not cut into an unknown old siding product to find out what it is.
For example, LP’s SmartSide care guidance advises against pressure washing its engineered wood siding. That is a reason to name the actual siding in the scope, not a reason to treat every wood-like board as LP SmartSide. Fiber-cement repainting has a separate set of material and finish questions.
Separate coating damage from wood damage
Make a wall-by-wall condition list from the ground or another safe position. Record the location and visible symptom before anyone covers it with filler or primer.
| What you see | What needs to be resolved | Likely scope to discuss |
|---|---|---|
| A small bare area surrounded by firmly attached paint | Whether the surrounding coating and wood are sound | Local preparation and a compatible primer or self-priming system |
| Peeling below a gutter, sill or roof intersection | Where water enters and whether the wood can dry | Water-management repair before coating preparation |
| Gray exposed wood or loose surface fibers | How much weathered material must be removed without damaging the board | Controlled surface preparation and a representative finish sample |
| A split, open joint or failed filler patch | Movement, joint design and sound material available for repair | A repair method matched to the defect; filler alone may be unsuitable |
| Soft, crumbling or deeply deteriorated wood | Extent of decay and whether the member carries a load | Carpentry or a qualified repair assessment before paint |
| Broad layers lifting together | Which layer is failing and how far failure extends | A larger removal scope or revised expectations for retained coatings |
These are inspection prompts, not diagnoses from appearance alone. A painter may need a carpenter, roofer or preservation specialist to resolve the cause. A fresh finish cannot make a deteriorated sill structurally sound.
Fix the water route before the paint route
Follow the problem uphill. A stain under a window may begin at the head flashing; peeling near the bottom of a wall may relate to splashback, grade, a downspout or an irrigation pattern. Check gutters, roof-to-wall intersections, open joints and places where water repeatedly reaches end grain. Interior moisture can also contribute and should not be dismissed just because the damage is outside.
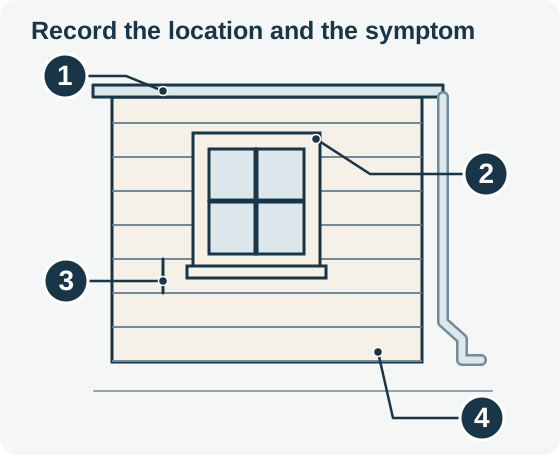
Record the symptom together with its surroundings from a safe position. These locations guide the assessment; the drawing does not diagnose a leak or specify a repair.
- Gutter area: include the roof edge and gutter when documenting nearby peeling or staining.
- Window perimeter: include the opening and the wall above and below it, so the assessor can consider more than the visible mark.
- Board joint: record a split, open joint or failed repair without assuming that every opening should be filled.
- Lower wall: include the ground and nearby downspout or splash area. The actual exposure and source of wetting require assessment.
Concept references: Sherwin-Williams exterior moisture guidance.
Sherwin-Williams identifies damp substrates and several exterior or interior water paths among the causes of moisture-related exterior peeling. Its practical implication is simple: removing loose paint treats the visible failure, while correcting the water path addresses a possible cause.
Ask the proposal to distinguish painting work from gutter, flashing, drainage and carpentry work. If another trade must act first, put that dependency in the schedule. “Caulk all gaps” is not an adequate substitute for identifying which joints should be sealed and which openings are intended to drain or permit movement.
Decide what old paint can stay
A repaint does not automatically require stripping every board to bare wood. It also cannot rely on a new coat to hold down a failing old one. The question is whether the retained layers provide a suitable base after cleaning and preparation.
On historic woodwork, the National Park Service’s Preservation Brief 10 supports condition-based treatment and avoiding unnecessary removal of sound historic paint. Retained layers can preserve evidence of earlier colors; aggressive removal can damage profiles and wood surfaces. This older preservation guidance is useful for that principle, while current Kansas lead rules and current product instructions govern the work methods.
Have a representative area assessed before pricing the whole wall as “light scraping.” The scope should say how loose coating will be identified, where removal stops and what happens if a larger weak layer is uncovered. Agree on appearance as well as adhesion: sound old paint edges can remain visible after a technically appropriate repaint. A perfectly flat, newly milled appearance can require a very different intervention.
For a pre-1978 home, settle the Kansas lead-paint requirements before disturbing coatings. Do not scrape a test patch as a homeowner shortcut. Kansas-specific testing and work-practice rules differ from common national DIY advice.
Cleaning and drying need their own acceptance criteria
Cleaning should remove the contamination that would interfere with adhesion without creating new damage or driving water into the assembly. The method depends on the siding, old coating, lead status and access. A high-pressure wash is not a universal preparation requirement.
Ask what cleaner will be used, how it will be rinsed and how adjacent surfaces and plantings will be protected. Cleaning residue can create a new bonding problem. Mildew, oily contamination and ordinary dirt may need different treatments; one unspecified wash should not be assumed to solve them all.
“It has been a day since washing” does not establish dryness. Shade, joints, end grain and the extent of wetting can change the drying period. The person specifying the coating should explain how readiness will be checked against that product’s requirements. If a moisture reading is used, the instrument, material and acceptable condition need to make sense together; a number without that context is not a complete inspection.
Match the primer to the exposed surface
The useful question is what each area needs from its first coat: adhesion, stain blocking, protection of exposed wood or compatibility with an existing finish. A universal “oil primer on everything” specification can be as incomplete as “paint and primer in one, no preparation needed.”
Some coating systems permit self-priming on specified surfaces. Some woods and stains require a separate stain-blocking product. Repairs may have their own primer requirements. Ask for the exact primer and topcoat names, the surfaces assigned to each and the applicable instructions. A brand name alone leaves too much unresolved.
Brown discoloration deserves its own assessment. Wood extractives moving through a coating are different from residue on top of fresh paint; see brown stains on exterior paint before assuming another coat of primer is the answer.
Treat repairs as a separate part of the proposal
Cosmetic filling, localized wood repair and board replacement are different tasks. The written scope should identify which defects are included and who approves additional work after preparation reveals concealed damage.
For repair materials, ask about suitable defect size, sound surrounding wood, required moisture condition, cure time and compatibility with the coating. Filler should not be used to hide a failed structural connection or an unresolved leak. Replacing a board also raises questions about profile, thickness, fastening, end treatment and adjoining flashing.
On a historic home, discuss retaining repairable original material and matching the profile before ordering replacement boards. Historic-home painting covers the broader coordination between preservation review, repairs and finish work.
A preparation scope you can compare
Ask each bidder to describe the same representative wall and trouble spots. A useful written scope records:
- Identified siding and existing coating condition, including areas not accessible during the first visit.
- Water-management and carpentry work that must precede painting.
- Lead-related assessment and work arrangements where applicable.
- Cleaning, removal of failed coating and the expected texture of retained edges.
- Repairs, primers, sealants and finish products assigned to particular surfaces.
- How dryness and the weather window will be checked.
- A price or approval process for additional damage discovered during preparation.
Keep a few dated overview and close-up photos ready for the follow-up conversation. The most useful photos show both the defect and the surrounding window, gutter or board arrangement. Add the last known repaint date and product records if you have them. These details help define the inspection; they do not replace seeing the siding.
For a project-wide checklist, use the house-painting planning guide. To request an assessment, describe the material, peeling areas, repairs and access in the quote form.
Browse the painting guide library for related preparation and finish decisions.