
PAINTING TROUBLESHOOTING · LEAVENWORTH
Brown stains on exterior paint
Leavenworth Painting · Published October 28, 2026
Brown marks on exterior paint do not all have the same cause. Wood extractives can migrate through the coating as tannin staining. Water-soluble ingredients in a fresh latex paint can collect on its surface as surfactant leaching. Rust, runoff, dirt and biological growth can produce other marks. The right response depends on the material, timing, pattern and condition of the paint—not the color of the stain alone.
Before adding another coat, record what happened and have the surface assessed. This is especially useful after a recent exterior painting project, when product and weather records may still be available.
Start with four observations
Record the siding or trim material, the date of painting, when the marks appeared and whether the film remains intact. Add an overview photo that includes the feature above the stain: a fastener, window, gutter, roof edge or wood detail may be relevant.
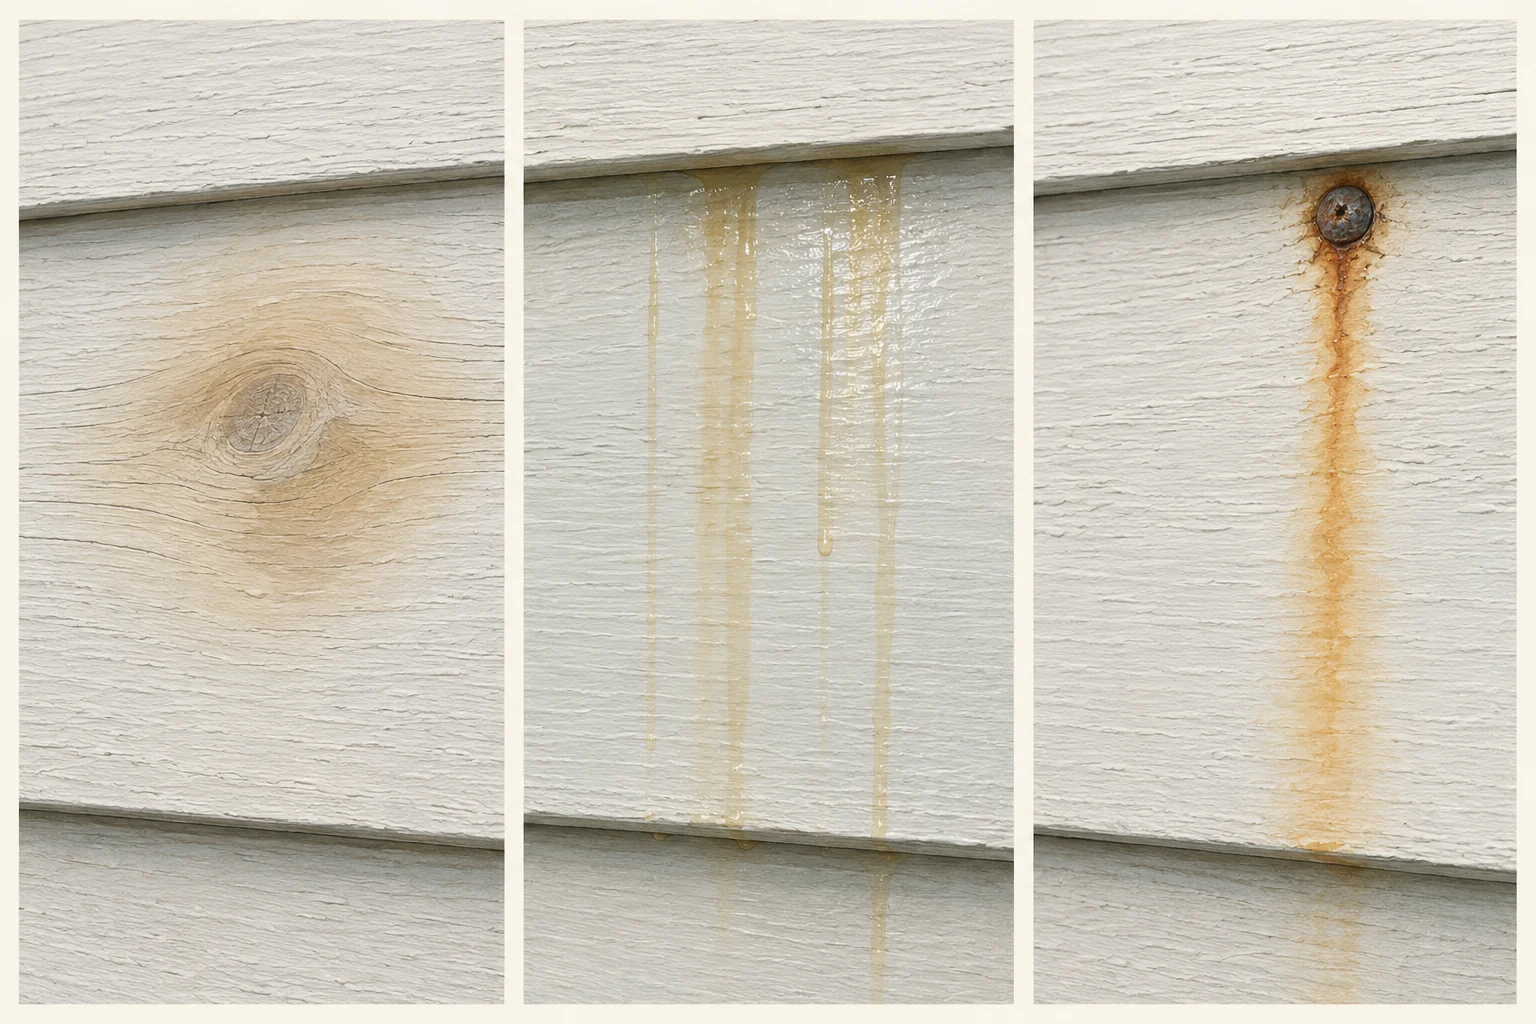
Look from safe access. Do not scrape or sand to identify the stain. If older coatings may be present, resolve the Kansas lead-paint requirements before any disturbance. Also avoid testing a succession of cleaners on the entire wall; an unsuitable chemical or abrasive method can create a second problem.
| Clue | Possibility to investigate | Next question |
|---|---|---|
| Tan or brown discoloration associated with wood or knots | Wood extractives moving through the finish | Is the wood wet, and was an appropriate stain-control system specified? |
| Glossy, sticky or streaked deposits on recently applied latex paint after damp conditions | Surfactant leaching | What were the product, curing conditions and timing of moisture exposure? |
| A run beginning at a fastener or metal component | Corrosion or runoff from metal | Does the metal need repair or treatment before the finish is addressed? |
| A repeated mark below a gutter or roof detail | Water carrying material from above | What is the source of the runoff? |
| Dark patches in a persistently damp area | Dirt, biological growth or another contamination | What is present, and which cleaning method is compatible? |
| Staining accompanied by bubbles or peeling | A coating or moisture problem as well as discoloration | Is adhesion affected, and what is the underlying cause? |
The clues can overlap. A brown mark on painted wood is not automatically tannin bleed, and a fresh paint job can have more than one condition.
Tannin staining comes from the wood
Tannins are naturally occurring wood extractives. Some can move with moisture and discolor the coating above them. Cedar and redwood are familiar examples of staining woods, but the possibility is not limited to those species or to new lumber.
Sherwin-Williams’ tannin-staining guidance distinguishes this migration through the film from ordinary surface dirt. It directs attention to moisture when staining develops later on an intact coating and calls for a suitable stain-blocking coating after the cause and surface condition are addressed.
That creates two separate decisions. First, determine whether water is entering or remaining in the wood. Second, choose the preparation and primer or coating system needed for the staining. Skipping the first decision can leave the new finish exposed to the same recurring condition.
A stain-blocking product must be appropriate for exterior use, the wood and the intended topcoat. An interior spot primer is not automatically suitable for a broad exterior application. Ask which exact product is proposed and whether its coverage, drying and topcoat requirements fit the project.
Surfactant leaching is a surface residue from paint
Latex paints contain water-soluble ingredients that help the coating function during application. Under some drying conditions, these ingredients can concentrate at the film surface. The resulting deposits may be clear, tan or brown and can appear glossy or feel sticky or soapy.
The manufacturer’s surfactant-leaching guidance associates this condition with moisture reaching an uncured film and slower drying in cool conditions. It describes clean-water rinsing and gentle treatment for exterior deposits, with repainting potentially needed when stains cannot be removed. Some minor exterior deposits can weather away.
Do not translate that into “every brown stain will rinse off” or “ignore it indefinitely.” Confirm that surfactant leaching is the likely condition and obtain cleaning guidance for the actual paint. A newly developing finish can be damaged by aggressive scrubbing, pressure or an unsuitable cleaner. The coating manufacturer can advise on timing and method for the specific product.
If the deposit is removable and the film remains sound, a stain-blocking primer may not be the relevant first response. If cleaning leaves lasting marks, or the film is also peeling, the assessment needs to go further.
The timing helps separate the questions
For marks shortly after painting, gather the application date, product and sheen, wall location, weather and the timing of dew or rain. For a stain that returns months later in the same place, gather earlier photos and examine the recurring water route or material beneath it.
These records help frame the investigation without assigning blame prematurely. A damp night after painting may be relevant to a surface deposit, but it does not prove that every later mark has that origin. Likewise, wood under the coating makes tannin staining possible, but it does not rule out metal runoff above the board.
The useful question is what observation would distinguish the competing explanations. For example, does the run begin at a rusty fastener? Does the pattern follow knots? Is there a shiny surface residue over otherwise intact paint? Is the same area persistently wet? Let the assessor use those observations to choose an appropriate next step.
Cleaning is not the same as correcting the cause
A compatible cleaning treatment can improve appearance while leaving a leak or corrosion source unresolved. Ask whether the proposed work removes the visible mark, prevents recurrence or does both.
For any cleaning plan, clarify the product, permitted surface, test area, rinse method and protection of nearby materials. Follow the siding and coating manufacturers’ instructions. Do not mix cleaning chemicals or substitute a household recipe for the specified treatment.
If a cleaning test is appropriate, record its location and result. A test can show whether a particular deposit responds to that method; it does not by itself certify the condition of the whole wall. If the mark promptly returns, reassess the source before repeating stronger cleaning or adding paint.
On fiber cement or engineered wood, the finish and substrate impose their own limitations. See the fiber-cement maintenance guide and wood preparation guide for those material distinctions.
When priming or repainting becomes appropriate
Repainting can be part of the solution when the finish is permanently marked, adhesion has failed or the identified staining requires a different coating system. The order matters: correct the source where necessary, prepare a suitable surface, allow required drying and then apply the specified products.
Ask the proposal to explain why primer is needed and which stain or substrate it addresses. “Seal it with primer” is not a complete diagnosis. A primer designed to block wood extractives has a different job from cleaning residue off an intact fresh film or treating a corroded fastener.
When adhesion is affected, use the peeling and blistering guide to understand the additional investigation. A coating that is lifting requires more than cosmetic stain removal, even if the brown mark first drew attention to it.
A practical record for the inspection
You do not need to identify the chemistry before requesting help. Provide a short, factual description:
- The surface material and whether it was previously painted.
- Approximate repaint date and exact product records if available.
- When the mark appeared and whether it changes after rain or cleaning.
- Its location relative to wood knots, fasteners, gutters, windows and roof details.
- Whether the paint is intact, glossy in spots, cracked, blistered or peeling.
- Any prior cleaning or repair, including the products used.
Keep the original photos before cleaning and add later photos from a similar position. This helps show change without relying on memory. Avoid treating a phone image as a definitive diagnosis; the inspection may need to assess moisture, adhesion and the surrounding assembly.
Reduce avoidable recurrence on the next project
Plan the full coating system around the material and condition, including any staining wood or repaired areas. Correct water-management defects first. Schedule application for a suitable weather and drying window, rather than judging the day only by the afternoon temperature.
Keep coating and tint records with the completed scope. If a mark appears, early documentation makes it easier to ask the painter and manufacturer a specific question. For long-term maintenance, distinguish a cosmetic stain from exposed material, loss of adhesion or active water entry; those findings can have different priorities.
Describe the staining and timing in the quote form, with photos ready for follow-up. The house-painting planning guide can help organize any wider repaint or repair work.
Browse the painting guide library for related preparation and finish decisions.