
PAINTING GUIDES · LEAVENWORTH
How to agree on the grain and finish of painted oak cabinets
Leavenworth Painting · Updated October 28, 2026
Oak grain usually remains visible after painting unless the preparation includes a separate grain-filling treatment. Paint changes the color; it does not reliably flatten the pores in an open-grained wood. The useful decision is how much texture you want to keep and what a representative finished sample must look like before the whole kitchen is coated.
For a Leavenworth kitchen, start with the doors you already have. A smooth white sample made from MDF will not show what the same color will look like on an oak door. Our cabinet painting service page covers the whole project; this guide focuses on agreeing on the appearance of painted oak.
Separate wood grain from defects
Several different marks can remain visible through paint. Calling all of them “grain” makes it difficult to compare a proposal or decide whether a result matches the agreed work.
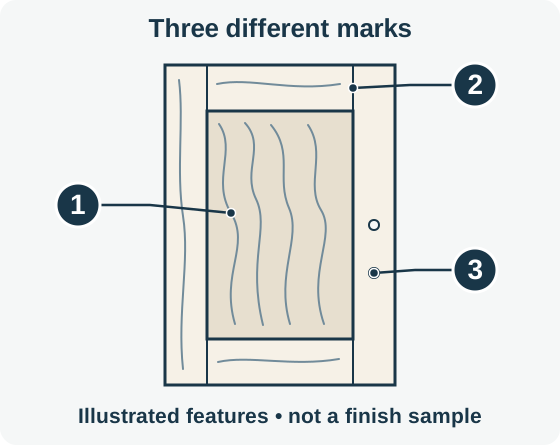
These features call for different conversations about preparation. The drawing identifies marks; it does not show a real painted-oak finish or a grain-filled sample.
- Grain: pores and lines belonging to the wood. Decide whether to retain that texture or discuss a compatible grain-filling process.
- Assembly joint: the connection between a horizontal rail and vertical stile. A joint line is separate from the pores within a piece of wood.
- Hardware hole: an old fixing location. Agree on hole repair and new hardware positions separately from grain treatment.
Concept references: Aqua Coat grain-filler guidance; KraftMaid cabinet terminology.
| What you see | What it may be | What to discuss |
|---|---|---|
| Repeating pores and lines following the wood | Natural grain texture | Whether to retain it or add a grain-filling process |
| A narrow line where a rail meets a stile | A door assembly joint | Expected joint appearance and movement; separate from pores |
| A scratch crossing the grain | Surface damage or preparation marks | Repair and inspection before the finish coats |
| Small depressions around old pulls | Hardware holes or dents | Hole filling, new hardware position and the agreed repair extent |
| Rippling or lifting at a thin face | A veneer or coating bond problem | Repair the material before discussing cosmetic filling |
| A rough, swollen lower edge | Possible water damage to the core | Whether the door or panel remains a suitable painting candidate |
This is a way to describe a surface, not a diagnosis from a photograph. A close-up can show the pattern, but the material and bond may need an in-person assessment. If the existing coating is lifting, use the peeling-cabinet decision guide before choosing a smoother finish.
Three finish expectations to compare
Painted oak with visible texture keeps the grain as part of the appearance. It can be an intentional choice, especially when the cabinet construction and door style are staying. The scope should still include suitable cleaning, repair, preparation and coating; visible grain is not permission to leave dirt, loose paint or avoidable application defects.
Painted oak with grain reduced adds a filling operation intended to make the surface smoother. Ask which surfaces receive it: door fronts alone, both sides, drawer fronts, face frames, exposed ends and the island can be different parts of the quote. A smooth door beside a visibly textured end panel may be acceptable, but it should be a choice.
A different door or cabinet surface changes the starting material. If the goal is a different profile as well as a very smooth appearance, compare door replacement or refacing with the painting scope. Grain filling does not change an arched panel into a square Shaker profile. Replacement decisions also involve fit, hinges, boxes and finish coordination.
There is no useful universal “percent of grain removed” promise for an unknown kitchen. Judge the representative sample and specify the work that produces it. A close-up taken under harsh light can be helpful for documenting texture, but also inspect the sample as the kitchen will normally be seen.
What grain filler does that primer does not
Grain filler is a separate material used to fill the pores of the wood. Primer prepares the surface for the next coating and may address adhesion, absorption or stains, depending on the selected product. They are not interchangeable jobs.
Aqua Coat’s manufacturer guidance describes its White Cabinet Grain Filler for painted wood and distinguishes it from its clear filler. It also addresses application over an already-painted surface only after the previous coating has cured and with specified preparation. That is an example of why the exact filler and coating sequence matter; it is not a reason to put an arbitrary filler over any existing finish.
Ask the painter to identify the proposed filler, where it goes in the system and how compatibility is established. The order can depend on the existing surface and the chosen materials. A universal instruction to “fill before everything” or “fill over any primer” leaves out those differences.
More paint is not a substitute for an agreed filling process. Building excessive film in an attempt to bury the texture can interfere with the coating’s application and drying requirements. The cabinet paint and primer guide explains what belongs in a full specification, including coverage and coat thickness.
Approve a sample that answers the real question
A sample should settle texture, color and sheen together. The Benjamin Moore cabinet refinishing guide recommends sample boards showing finish choices and stages of the coating process. For an existing oak kitchen, ask how the sample represents your actual doors rather than a different smooth material.
Use this acceptance checklist before authorizing the full finish:
- Choose a representative piece. Include open grain, a profile or edge and a joint if those appear throughout the kitchen. Agree before removing or altering a door.
- Record the complete preparation. A color-only sample cannot establish how the filled surface will look. Note which repairs and filling steps the sample includes.
- Use the intended finish. Record product, color and sheen. A flat sample can conceal texture that becomes more apparent in a shinier finish.
- View it in place. Look near the window, under the kitchen lights and from the normal doorway. Move around it to see side light as well as the face.
- Describe what you accept. Record visible pores, profile definition and joint lines. If the sample needs another preparation step, settle that before it becomes the standard for the kitchen.
- Keep the reference. Identify the accepted sample in the written scope and retain a photograph. A photograph helps document the agreement but cannot reproduce sheen and texture as reliably as the physical piece.
A useful sample gives both sides a shared target before a large amount of work is committed.
Why filling changes the scope and schedule
The added work includes applying the selected material, allowing the required drying, preparing it for the next layer and checking the result. Profiles and damaged areas may need different attention from broad flat panels. Door count alone does not describe all of that work.
Compare the same set of surfaces in every quote. A proposal that includes fronts, backs, fixed boxes and exposed ends cannot be compared directly with one that fills only the door fronts. Ask how the painter handles an area that does not meet the sample after the planned preparation, and whether that possibility is included or requires a written change.
Avoid a fixed surcharge borrowed from another kitchen. Ask for the additional preparation as a named scope item and compare the total project. The painting quote comparison guide includes a worksheet for recording what is included, excluded and still subject to inspection.
Drying between the filler, primer and enamel stages also affects the calendar. The coat that feels dry is not automatically ready for the next operation. Agree on kitchen access and the system-specific handling instructions before work begins.
What to send for an oak-cabinet assessment
Prepare a whole-kitchen view, a close-up of a typical door in side light, the back of a door, an exposed end panel and any damaged area near the sink. Add the approximate number of doors and drawer fronts, whether you want the inside surfaces painted, and whether hardware positions will change.
Describe the result in plain language: “I am comfortable seeing the wood texture,” “I want the pores reduced and need to approve a sample,” or “I want a different door style as well as a smoother surface.” These lead to different scopes. Keep the actual photographs ready for the follow-up; the website quote form does not upload files.
For the room around the kitchen, the interior painting page separates walls, ceilings and trim from cabinet work. Use the house-painting planning guide to coordinate those jobs and the kitchen’s access needs.
The guide library brings the related cabinet and interior decisions together.