
PAINTING GUIDES · LEAVENWORTH
How to compare cabinet paint and primer specifications
Leavenworth Painting · Updated October 28, 2026
A useful cabinet-paint specification names the surface preparation, primer, enamel, sheen and return-to-use instructions. The brand name alone leaves most of those decisions unanswered. Two respected enamels can have different recoat instructions, and neither can compensate for a weak existing finish underneath.
This guide compares what to look for in a cabinet coating system, with two documented satin-enamel examples. It helps you review a proposal for cabinet painting in Leavenworth; the written quote should identify the actual products selected for your kitchen.
Start with the surface, not a paint ranking
Before comparing a topcoat, identify what will remain under it. Is the door solid wood, thin veneer, MDF or a wrapped surface? Is the old finish firmly attached? Are the sink-side edges swollen? Does a sample need to demonstrate stain blocking, adhesion or grain reduction?
A topcoat comparison makes sense only after those questions are answered. A structurally sound oak door with a stable clear finish is a different project from a foil-wrapped door with lifting edges. If the existing material is failing, resolve the repair-or-repaint decision first.
The coating system is the complete sequence of compatible materials and preparation, not just the last can opened. A proposal should explain which layers are staying, what is removed, how the remaining surface is prepared and what new layers are applied. That also gives you a more useful basis for comparing prices than a promise of “premium cabinet paint.”
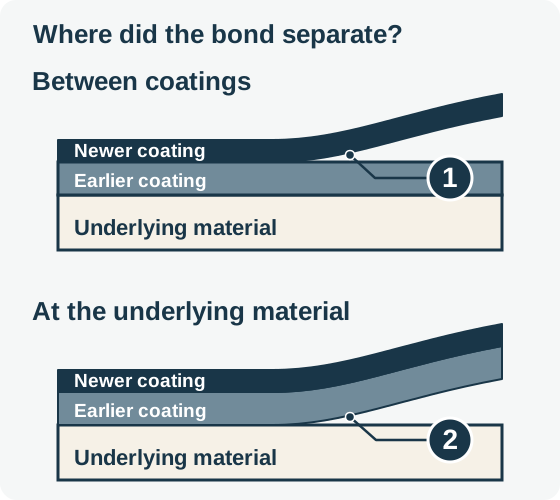
Identify the interface that failed before choosing what can stay. Layers and gaps are enlarged for clarity; this example is not a required primer-and-paint schedule.
- Between coatings: the upper, newer film separates from an earlier coating. The exposed surface may still be paint rather than bare material.
- At the material: the earlier coating separates from the underlying surface and carries the newer coating with it. A new topcoat does not restore that lower bond.
Concept references: Sherwin-Williams peeling guidance.
Two satin enamels, read from their actual sheets
The examples below use manufacturer-hosted US documents checked on October 27, 2026. They illustrate why a schedule must identify the exact product and finish. They do not establish that either is the coating selected for your job, and they are not a comparative durability test.
| Detail to compare | Emerald Urethane Trim Enamel Satin | ADVANCE Waterborne Interior Alkyd Satin 792 |
|---|---|---|
| Document used | K37 series, sheet 101.010SAD, March 2026 | US 792 technical sheet, April 10, 2023, currently linked by the manufacturer |
| Published reference conditions | 77°F and 50% relative humidity | 77°F and 50% relative humidity |
| Touch / recoat | 1 hour / 4 hours | 4–6 hours / 16 hours |
| What changes the timing | Temperature, humidity and film thickness | High humidity and cooler temperatures prolong dry, recoat and cure times |
| What the recoat figure does not mean | A full-cure or door-rehanging deadline | A full-cure or door-rehanging deadline |
Sources: Sherwin-Williams K37 Satin data sheet and Benjamin Moore ADVANCE 792 US data sheet. The ADVANCE sheet separately says to avoid heavy abrasion and returning shelves or tabletops to service for at least 5–7 days; it says hardness and adhesion develop over time. That is not a seven-day full-cure claim. The Emerald sheet does not supply a full-cure deadline to borrow for a kitchen schedule.
These examples explain why repeating “cabinet paint needs sixteen hours between coats” is inaccurate. It can describe a particular product’s specified conditions, but it is not a rule for every enamel. Likewise, the shorter recoat example does not by itself prove a shorter complete project: preparation, access, primer, handling and reassembly still matter.
Give each primer a defined job
A primer may need to bond to a slick surface, reduce uneven absorption or block a stain. Those are different requirements. Ask which one the proposed product is addressing and how the remaining requirements are handled.
| Condition found during assessment | Question the specification should answer |
|---|---|
| Firmly attached glossy clear finish | What preparation and bonding system are compatible with that finish? |
| Exposed wood or absorbent repaired edges | How will the prepared area be sealed without leaving a visible transition? |
| Knots, tannin bleed or a persistent stain | Which stain-blocking product is suitable, and how is the test area judged? |
| Mixed old paint and bare repairs | How are the different areas brought to a consistent surface? |
| Open oak grain | Is grain reduction included as a separate process, and where? |
| Loose coating or damaged material | What must be removed, repaired or replaced before priming? |
For example, the B-I-N Shellac-Base Primer technical sheet, BIN-03 revision November 12, 2024, lists interior cabinets and woodwork, stain-blocking uses, and clean, dry, sound surface requirements. It also instructs users not to use TSP as a cleaner. A generic cleaning recipe copied from another system would therefore be a poor substitute for this product’s directions.
That example does not make shellac primer the answer to every cabinet. Product selection must also address ventilation, application, compatibility and the condition found. Ask for those decisions in the scope rather than choosing a primer solely because its label says “bonding” or “stain blocker.”
Read coat count with coverage and preparation
“Two coats” tells you how many passes are proposed, but not the condition of the surface or the intended amount of coating. A very thin pass and a heavily loaded pass are not equivalent. The application must follow the selected product’s coverage and film-build instructions, with the preparation it requires.
At the quote stage, you do not need to become a coating inspector. You need enough information to ask useful questions: Which surfaces are primed? Which receive the enamel? What happens at patched areas? Does the chosen color call for a particular primer shade or additional coverage? Will inside shelves receive the same system as door fronts?
Ask how a material change will be handled. If a specified product becomes unavailable, a replacement should be identified before use, with any resulting appearance, preparation or schedule change explained. An apparently similar sheen name does not establish identical appearance between product lines.
Spray, brush and roller describe application, not the entire result
Ask which pieces will be removed, where they will be finished and which surfaces will be coated in place. Application choices affect protection, access and the appearance of the finished surface. A description such as “sprayed doors, brushed fixed boxes” is more informative than a promise of a factory finish.
The useful comparison is a representative sample made with the intended system. For oak, include the agreed grain treatment; for a smooth manufactured surface, demonstrate the actual surface and preparation. See the oak grain and sample guide for a practical acceptance checklist.
Do not use a generic internet spray-pressure or thinning recipe for a different coating or machine. The chosen product’s application instructions and the equipment instructions belong together. This guide is for specifying and comparing a project; it is not a universal spraying procedure.
Put five milestones in the handover plan
Ask for separate guidance on the next coat, careful handling, reassembly, gentle use and normal cleaning. A data sheet may publish some of these and leave others to manufacturer guidance. A missing milestone should be clarified, not invented by subtracting hours from the promised completion date.
Record the conditions that matter inside the house as well as in the door-finishing area. Fixed boxes and removed doors may not experience the same temperature, ventilation or humidity. The work schedule should account for those differences instead of assuming every surface progresses together.
Before the crew leaves, clarify which appliances and storage areas are accessible, how to handle the doors, when to clean the finish and whom to contact if a door rubs or sticks. Keep the product, sheen, color formula and application date. A color name alone is not a reliable touch-up record.
A cabinet specification to take to the walk-through
Use the following headings in your notes. Ask the estimator to complete the items that cannot be determined from photographs.
- Material and condition: door type, exposed ends, previous coating, damaged areas and adhesion assessment.
- Included pieces: door fronts and backs, drawer fronts, boxes, interiors, shelves, island, trim and hardware.
- Preparation: cleaning method, coating removal, repairs, grain treatment and test area.
- Coating schedule: exact primer, topcoat, sheen, color and manufacturer instructions used.
- Appearance reference: sample, acceptable texture and treatment of visible joints.
- Access and care: kitchen work zones, appliance access, handling, cleaning and any return visit.
- Changes: what triggers additional work, how it is priced and how it is approved before proceeding.
The quote-comparison worksheet helps place two proposals alongside each other. Coordinate adjacent wall and trim work through the house-painting planning guide, while keeping the cabinet scope separately identified.
Find the supporting grain, preparation and repair articles in the painting guide library.